This is default featured slide 1 title

Go to Blogger edit html and find these sentences.Now replace these sentences with your own descriptions..

This is default featured slide 2 title

Go to Blogger edit html and find these sentences.Now replace these sentences with your own descriptions..

This is default featured slide 3 title

Go to Blogger edit html and find these sentences.Now replace these sentences with your own descriptions..

This is default featured slide 4 title

Go to Blogger edit html and find these sentences.Now replace these sentences with your own descriptions..

This is default featured slide 5 title

Go to Blogger edit html and find these sentences.Now replace these sentences with your own descriptions..

Tuesday, June 21, 2011

Apple 27-inch LED Cinema Display Review

Two years ago Apple introduced its first LED backlit Cinema Display. The 24-inch model updated the styling of Apple’s displays to match the unibody MacBook Pro’s ID. It also added features like a built-in MagSafe power supply and mini DisplayPort input, both targeted at owners of new Macs. Unlike most 24-inch displays however, the LED Cinema Display carried an $899 price tag at launch. Even today they are selling for over $600 used. By comparison, Dell will sell you a brand new 24-inch display for $259 or $539 if you want one with an IPS panel. Needless to say, Apple discontinuing the 24-inch LED Cinema Display makes sense. The company is generally uninterested in playing in value segments and I’m not sure there’s a huge market for $900 24-inch displays, regardless of what logo is on the back.

What is a lot more interesting however is the panel used in Apple’s 27-inch iMac. A 16:9 2560 x 1440 LED backlit LCD measuring 27” along the diagonal. Giving you 90% of the resolution of a 30” panel but in a more compact space. If you need more real estate than a standard 1920 x 1200 panel can give you and don’t want to resort to a multi-monitor setup, the 27-inch iMac was very appealing. There’s just one problem: it comes with a built in Mac.

What Apple has done in the 12 months since the release of the 27-inch iMac is separate the Mac from the display, leaving us with a 27-inch LED Cinema Display priced at $999.

Both the 24-inch LED and 30-inch panels are gone, the 27 takes their place in Apple’s display lineup. The new model is really an amalgamation of its predecessors. You get nearly the resolution of the 30-inch Cinema Display with the features of the 24-inch model.


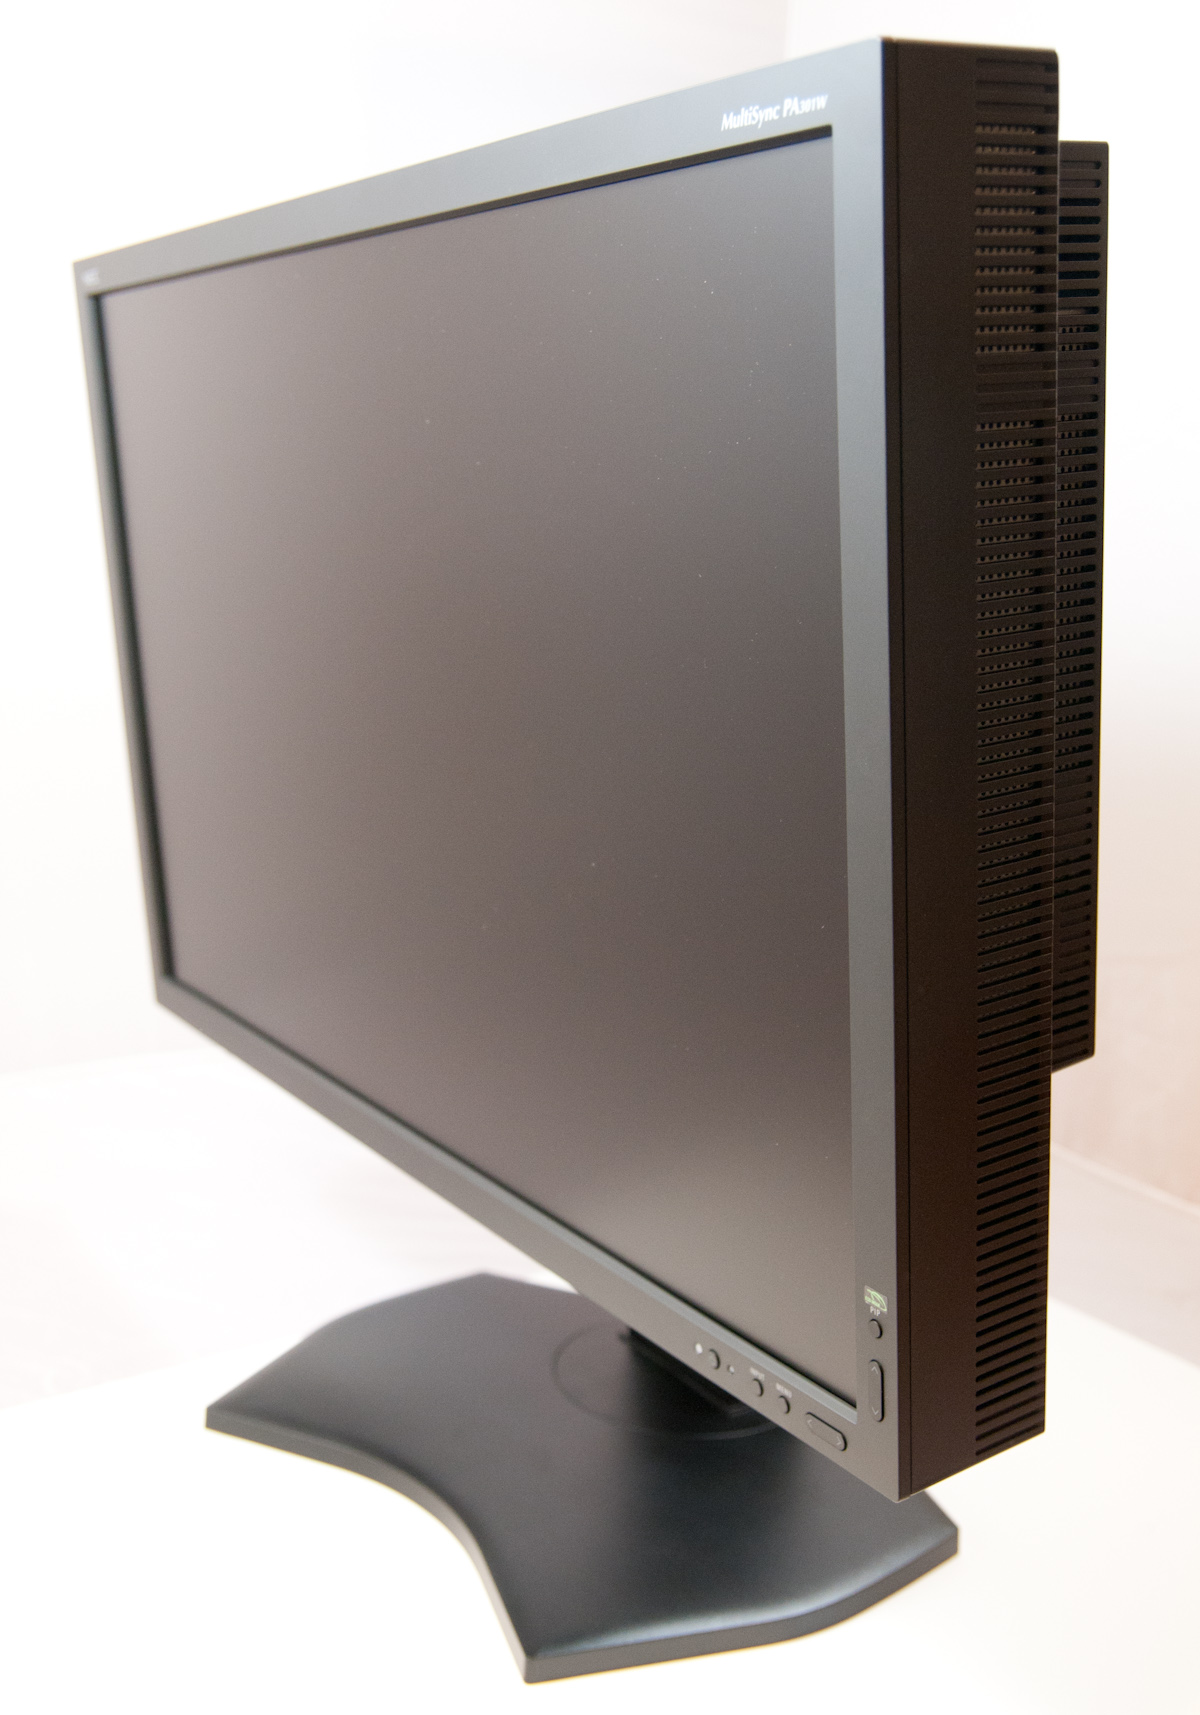
Those features start with the styling. The 27 has a glass front, reminiscent of the unibody MacBook Pro, complete with its overly reflective glory. Unlike the Macbook Pro however, the 27-inch LED Cinema Display will almost exclusively used indoors. Most rooms/offices having some degree of light control (hooray for blinds) and the display is bright enough to make glare from other lights sources a non-issue. The glossy front does pose a problem while watching videos full screen however. If you ever had dreams of being an actor, expect them to be somewhat fulfilled as you find your face in any dark scenes or objects (e.g. black shirt).

The stand is a solid piece of brushed aluminum. You can adjust the tilt of the display but there’s no option to adjust its height. This can be a major problem if you don’t have a height adjustable desk. Apple has a tendency to build very targeted devices, if you don’t fit the target, prepare to be frustrated.

The 27 uses an IPS panel paired with an LED backlight. You lose some color gamut since Apple continues to use white LEDs vs. RGB LEDs, but you gain a more compact package and lower power consumption.
There’s an integrated VGA camera along the top of the screen, once again a feature missing from the old 30 but present in the 24. Along the bottom you have a mesh grill for the integrated 2.1 speakers that come with the display.

Apple 27-inch LED Cinema Display Specifications
Property Quoted Specification
Video Inputs mini DisplayPort
Panel Type IPS, white LED backlight
Pixel Pitch 0.233 mm
Colors 16.7 Million (24 bit)
Brightness 375 nits typical
Contrast Ratio 1,000:1 (typical)
Response Time 12ms
Viewable Size 27" (68.58 cm) diagonal
Resolution 2560 x 1440
Viewing Angle 178 degrees horizontal, 178 degrees vertical
Power Consumption (operation) up to 250W while charging MacBook Pro
Power Consumption (standby) <1 watt
Screen Treatment Glossy
Height-Adjustable No
Tilt Yes
Pivot No
Swivel No
VESA Wall Mounting Yes
Dimensions w/ Base (WxHxD) 25.7" (650 mm) x 19.35" (491 mm) x 8.15" (207 mm)
Weight w/ Stand 23.5 lbs (10.7 kg)
Additional Features 85W MagSafe Power Adapter integrated, 2.1 Speaker System integrated, 3 x USB port hub
Limited Warranty 1 year limited warranty
Accessories Breakout cable with miniDP, USB, MagSafe power, power cable
Price $999
 
Integrated MagSafe Power Adapter

Around back there’s a plug for power and a single cable that carries mini DisplayPort, USB and MagSafe cables within it.


The MagSafe connector can be used to charge any MacBook, MacBook Pro or MacBook Air with a MagSafe connector. It’s a very convenient addition to the display and obviously works very well if you are using the Cinema Display with one of the aforementioned notebooks. If you aren’t however, the short length of the MagSafe power cable is annoying. I’ve got a desktop and a notebook and I wanted to use the power from the Cinema Display to keep my notebook charged while I’m using my dekstop. Unfortunately this meant that I have to keep my charging notebook very close to the display input on my desktop as there’s only 10” of slack on the MagSafe cable (cable to connector, add another 1.5” if you include the connector in the length).

 
Mini DisplayPort, Only

Mini DisplayPort is the only way to get video into this monitor, which pretty much rules out any Mac made before late 2008. Even EVGA’s GeForce GTX 285 Mac Edition lacks a mini-DP port. I was forced to go back to my old GeForce GT 120 in my Nehalem Mac Pro to use the display (which works despite Apple listing it as compatible with only the 24-inch LED Cinema Display). Like many Apple products, if you have the right hardware the combination works flawlessly, if you don’t it’s just frustrating. Atlona is the only company I’m aware of that makes a dual-link DVI to mini-DP adapter. It sells for $149.95 if you desperately want the new Cinema Display and don’t have a video card with mini-DP out. I have yet to try it but customer reviews on Amazon indicate it works with the 27-inch iMac at least.

 
Integrated Audio

With MagSafe and miniDP out of the way we’re left with the USB connector on the cable. The USB connector plays two roles. First and foremost it is to connect the three USB ports on the back of the display to your computer. The second role is to connect the internal USB audio device to your computer as well. Driving the integrated 2.1 speakers is a USB audio device integrated into the monitor (DisplayPort audio is also supported). You get basic driver support for the controller under both OS X and Windows 7.


The integrated speakers sound better than notebook speakers, but worse than a good set of desk speakers. There’s very little bass and the highs can be a bit harsh at loud volumes. Then there’s the issue of where the sound actually comes from. The speakers point downward, a couple of bounces later and it sounds like music comes from behind your display rather than straight at you as is the case with standalone speakers.
The speakers can get loud. At their lowest setting I measured 47dB(A) sitting 2 feet away in my office (40 dB(A) ambient noise), but cranked all the way up the sound meter registered 87dB(A). The issue at high volumes is you really begin to see the limits of the speakers. There’s only so much you can do with speakers integrated into a display after all.

Again the speakers are a definite upgrade from what you’ll find in your MacBook Pro, but if you’re a desktop user with a decent sound setup they will go largely unused. While I used them over the past few days, I definitely missed my Klipsch Promedia 2.1s.
 
Built in iSight, Not Half Bad

Webcams are ubiquitous in Apple's notebook and desktop lineups, the 27 supports the family tradition with its VGA still/video camera complete with green LED to indicate when it's active.


Image quality is surprisingly good even in my not-so-brightly-lit office:


Applications like Photo Booth under OS X can rely on the LED backlit screen as a flash to help. There’s a mic along the top of the display.


I iChatted with Brian Klug and he said the mic sounded good in practice.
Also at the top of of the screen is an ambient light sensor. With the option enabled in software as ambient light increases, the screen’s brightness will decrease and vise versa. For the most part I found the feature worked ok but in my office I often found that the increase/decrease wasn’t significant enough to make a difference as the day turned into night. The sensor was never over active unless I was taking pictures of myself in Photo Booth. The flash before every photo bounced back, hit the light sensor and caused the display to dim significantly. Presumably you won’t be doing that all of the time and if you are, there’s always the option to turn it off.


Like all Apple displays there’s no OSD, everything is done in software. Under OS X this means you need to download the latest update for the 27-inch LED Cinema Display. Under Windows you need to download an update to Boot Camp 3.1. The good news is that the display works under Windows 7, the bad news is you need Boot Camp installed to get brightness control. The downloadable Windows drivers won’t work on a system without Boot Camp installed, in other words, on a normal PC you lose the ability to control brightness. Apple should make the 27-inch Windows control panel a standalone package and not tie it to Boot Camp. It seems as if Apple expects the only users interested in this panel will be those who already own an Intel based Mac. Self fulfilling prophecy much?

Apple Mac Pro (Mid 2010) Review

It’s the fastest Mac you can buy and it's a desktop. These days, the Mac Pro is basically the un-Mac.
For years users have argued that Apple needs a standard Mac. A decent desktop that fills the $1000 - $2000 price range. Apple has refused to entertain the idea for what I can only assume are a number of reasons. At lower price points it’s difficult to justify the Apple tax, thus driving margins lower and ultimately impacting stock price. There’s also the issue of cannibalization. A standard Mac could potentially drive customers away from the iMac and into a Mac + cheap monitor configuration. From Apple’s perspective this probably harms the overall user experience (what if a customer buys an inferior display and uses it with a Mac?) and it only allows Apple to realize profit on a computer, not a computer + display.

This leaves us with the current product lineup. The Mac mini at the low end of the OS X scale, the iMac in the middle and the Mac Pro up top. If you want something high performance without an integrated display but more affordable than the Mac Pro then there’s always the Hackintosh route.


I spend all of this time talking about price because the Mac Pro isn’t cheap. Since its introduction in 2006 the Mac Pro lineup starts at $2499:

Historical Look at the Mac Pro
  Late 2006 Early 2008 Early 2009 Mid 2010
CPU 2 x Xeon 5150 (2.66GHz - 2C/2T) 2 x Xeon E5462 (2.8GHz - 4C/4T) 1 x Xeon W3520 (2.66GHz - 4C/8T) 1 x Xeon W3530 (2.8GHz - 4C/8T)
Memory 2 x 512MB DDR2-667 FB-DIMMs 2 x 1GB DDR2-800 3 x 1GB DDR3-1066 3 x 1GB DDR3-1066
Graphics GeForce 7300 GT Radeon HD 2600 XT GeForce GT 120 Radeon HD 5770 1GB
Hard Drive 250GB 320GB 640GB 1TB
Optical 6X DL SuperDrive 8X DL SuperDrive 18X DL SuperDrive 18x DL SuperDrive
Prices $2499 $2799 $2499 $2499

The specs have of course improved tremendously year over year. The Mac Pro was born after Apple decided to migrate to Intel based CPUs. It started with a dual-socket Conroe based Xeon, later saw an upgrade to Clovertown and then in 2009 moved to Nehalem. This summer Apple updated the hardware to Westmere, Intel’s current 32nm architecture.

While there were only two configurations for the Mac Pro (4 and 8 core), Westmere adds a third model: a 12-core Mac Pro priced at $4999. Of course there are build to order options in between all three of them.

Mid-2010 Mac Pro Lineup
  Quad-Core 8-Core 12-Core
CPU 1 x Xeon W3530 (2.8GHz - 4C/8T) 2 x Xeon E5620 (2.4GHz - 4C/8T) 2 x Xeon X5650 (2.66GHz - 6C/12T)
Memory 3 x 1GB DDR3-1066 6GB DDR3-1066 6GB DDR3-1333
Graphics Radeon HD 5770 1GB ATI Radeon HD 5770 1GB ATI Radeon HD 5770 1GB
Hard Drive 1TB 1TB 7200RPM SATA 1TB 7200RPM SATA
Optical 18x DL SuperDrive 18x DL SuperDrive 18x DL SuperDrive
Prices $2499 $3499 $4999

Estimating the “Apple Tax”

Despite the high cost of entry, historically the Apple tax has been nonexistent on the Mac Pro. I shopped around Dell and HP’s websites to see if I could find similarly configured systems to the new Mac Pro. For the most part Apple was priced identically if not cheaper than Dell and HP for both the single and dual-socket Mac Pros:

Estimating the Apple Tax on the 2010 Mac Pro
  Apple Mac Pro Dell Precision T5500 Custom Built
CPU 2 x Xeon E5620 (2.4GHz quad-core 12MB L3) 2 x Xeon E5620 (2.4GHz quad-core 12MB L3) 2 x Xeon E5620 (2.4GHz quad-core 12MB L3)
Memory 6GB DDR3-1066 6GB DDR3-1333 Kingston 6GB DDR3-1333
Graphics ATI Radeon HD 5770 1GB ATI FirePro V8700 1GB Sapphire Radeon HD 5770 1GB
Hard Drive 1TB 7200RPM SATA 1TB 7200RPM SATA WD Caviar Black 1TB 7200RPM SATA
Optical 18x DL SuperDrive 16X DVD +/- RW LG 24X DVD +/- RW
Notes $249 for 3-year warranty  3 year warranty standard Includes Corsair Obsidian 700D case at $249.99, Antec 750W PSU, ASUS Z8NA-D6C Motherboard at $259.99
Prices $3499 + $249 for 3 year warranty
$3748
$3895 $1752.90 + OS
The Dell comes with a more expensive video card since there wasn’t an option for a Radeon HD 5770 class part. Other than that the two systems are similarly configured and there’s no real price premium for the Mac. You can obviously save a ton of money if you don’t need a dual-socket, eight-core beast but if you’re buying in this class of products Apple is price competitive. This isn’t anything new. I ran the same comparison in our first Mac Pro review and came out with similar results. There’s effectively no “Apple tax” on the Mac Pro.
 
Update: Dell doesn't offer a Radeon HD 5770, instead you get a much more expensive FirePro V8700 graphics card. If deduct the street price for the graphics card from each machine, the Mac Pro ends up being $324 more expensive than the Dell. The Apple tax is there, but masked by the cheaper GPU.
 
Update 2: There's one more key difference in the specs. The Dell comes with a 3 year warranty vs. Apple's  1  year warranty. To get 3 years from Apple you need to purchase the $249 Apple Care add-on. Also, as many have pointed out, Dell can offer significant discounts over the phone. Apple can offer large discounts as well if you are an educational or business customer.


Where you can save a ton of money building your own however. A quick look through Newegg gave us a similar configuration to the Apple and Dell systems for $1612.91 plus the cost of the OS.

Apple's 11-inch Upgraded MacBook Air: Do 1.6GHz and 4GB Make a Difference?

Last month we looked at Apple’s new 11-inch and 13-inch MacBook Airs. I concluded the 11-inch was the pinnacle of portability, delivering the weight and form factor of a netbook but without the drive-you-crazy performance of an Atom. The 13-inch was more of a regular, get-your-work done notebook - just in a very thin and very light chassis. I liked carrying the 11-inch MBA, but I liked working on the 13-inch. My typical workflow was simply too slow on the 1.4GHz 11-inch system.

Apple offers two potentially important upgrades for the 11-inch MacBook Air that could alleviate some of my concerns. For $100 more than its $999 starting price, you can outfit the 11 with 4GB of memory instead of 2GB. Light web browsing and writing don’t need more than 2GB, but start editing videos, photos or open way too many apps at once and you’ll quickly want more memory. If you’re planning on keeping your system for a while, the 4GB upgrade makes a lot of sense. And many Apple stores actually stock the upgraded 4GB model.


The next upgrade is a bit harder to swallow. The base 11-inch MacBook Air can’t be upgraded aside from memory. The $1199 model however, can. You get a 128GB SSD (up from 64GB) as well as the option to pay $100 for a 1.6GHz Core 2 Duo.

Normally 200MHz isn’t much to write home about, especially not for $300 more than the standard 11. However, 200MHz is a 14% increase in clock speed compared to the base model. In applications that are CPU bound, you may see close to that percentage in improved performance. The magic number for feeling a performance increase is 10%. Anything below that is tough to feel in real world use, but anything at or above that 10% mark usually feels quicker.

MacBook Air Spec Comparison
  11-inch Upgraded 11-inch 13-inch
CPU Intel Core 2 Duo 1.4GHz Intel Core 2 Duo 1.6GHz Intel Core 2 Duo 1.86GHz (2.13GHz optional)
Memory 2GB DDR3-1066 soldered on-board 4GB DDR3-1066 soldered on-board 2GB DDR3-1066 soldered on-board (4GB optional)
GPU NVIDIA GeForce 320M NVIDIA GeForce 320M NVIDIA GeForce 320M
Storage 64GB SSD 128GB SSD 128GB SSD (256GB optional)
Connectivity 802.11a/b/g/n Bluetooth 2.1 + EDR 802.11a/b/g/n Bluetooth 2.1 + EDR 802.11a/b/g/n Bluetooth 2.1 + EDR
Battery Capacity 35 Whr 35 Whr 50 Whr
Dimensions 11.8 " x 7.56 " x 0.11 - 0.68"
(29.95 cm x 19.2 cm x 0.3 - 1.7 cm)
11.8 " x 7.56 " x 0.11 - 0.68"
(29.95 cm x 19.2 cm x 0.3 - 1.7 cm)
12.8 " x 8.94 " x 0.11 - 0.68"
(32.5 cm x 22.7 cm x 0.3 - 1.7 cm)
Weight 2.3 lbs (1.06 kg) 2.3 lbs (1.06 kg) 2.9 lbs (1.32 kg)
Price $999 $1399 $1299

Combine the two upgrades and you’ve got a fairly expensive MacBook Air ($1399 if you’re keeping score). But if you want the portability of the 11 and are looking to get as much performance as possible, it’s your only option.


Luckily we happened to come across such a system. And we didn’t hesitate to test it.

Motorola Droid 3 Pops up in GLBenchmark-A VerizonXT883 with OMAP4

A tipster dropped a link our way early this morning to a GLBenchmark 2.0 results browser page that might be of interest to many. Hit that page and you'll find a complete run of the current GLBenchmark 2.0 suite, and a bit of a confirmation about what is and isn't the upcoming Motorola Droid 3. It isn't Tegra 2, it's OMAP 4430.

First off, the hardware specifications that we can glean from the information page seem to make it a virtually identical match with the specs of the Motorola Milestone 3, or XT883. That means a qHD 960x540 display likely 4" in size, hardware five-row QWERTY keyboard, Android 2.3.4, a possible 1 GB of LPDDR2 (512 MB is the other less-desirable, rumored number), 8 MP rear camera, front camera, and of course an accompanying CDMA2000 baseband for Verizon.


Given the number of recent flagship Motorola product launches with Tegra 2 SoCs, starting with the Motorola Atrix, the Droid X2, and the now-delayed Droid Bionic it seemed that a flagship (read: QWERTY keyboard-packing) summer Motorola Droid launch with Tegra 2 was inevitable. From the results page, it now seems that the Motorola Droid 3 will include a 1GHz OMAP 4430 SoC with PowerVR SGX 540 graphics, and not a Tegra 2.

The model in the results browser is codenamed "Solana" which matches the codename we've heard about for the Verizon-bound Motorola Droid 3. The photos below are of the XT883 which the Motorola Droid 3 will undoubtedly bear an uncanny resemblance to.


Motorola Milestone 3 - XT883 for China (courtesy: Motorola Mobility)

The benchmarks themselves paint an interesting picture, and while we're at it I've tossed in some other devices we have in-hand but haven't finished our full reviews of yet for comparison with these results from the Motorola Droid 3. Again GLBenchmark 2.0 runs we're reporting here are at native resolution for the respective devices, which we've now included in the description line for comparison. For a quick refresher, WVGA is 800x480, FWVGA is 854x480, and qHD is 960x540. 

GLBenchmark 2.0 - Egypt
GLBenchmark 2.0 - PRO

I've highlighted the previous Motorola Droid 2 results (which we reviewed last year) just for fun to illustrate how far we've come in one calendar year.

Nokia N9 &N950 Officially Announced -MeeGo Running on OMAP3630

Back when we reviewed the Nokia N900 we really only wanted a few major improvements. A faster SoC, slightly thinner and more compact hardware, and more of Maemo Linux. It's been a long wait since then, and Nokia has changed its lineup, canceled the original N900 successor, taken on a new CEO, and rebooted itself under the Windows Phone 7 umbrella.

Those of us that wanted a smartphone running real bona-fide linux seemed destined to be waiting forever. Today however, Nokia officially announced the Nokia N9 and N950 at its Nokia Connection event in Singapore.

The N9 runs MeeGo, which as you likely know by now is the combination of Nokia's Maemo and Intel Moblin. MeeGo in smartphone form has something we've been waiting patiently for. The N9's industrial design looks nothing short of stunning, though all of the photos of the device so far appear to be renders and not actually physical hardware.

What's unique about the N9 is that the front of the device is buttonless, virtually everything is accomplished by tapping on the capacitive touchscreen, including unlocking the device. There's still volume, power, and camera buttons however. 

Nokia really seems to have spent a lot of time working on UI for MeeGo as evidenced by an interesting three home screen design, emphasis on using the swipe gesture to change applications, and pinch gestures for getting a multi-window view. The three home screens are purpose-designed for launching applications, viewing open applications and multitasking, and managing events such as news and messages. 

The N9 is polycarbonate plastic and unibody construction, and is sans-keyboard. Its cousin is the similarly-specced N950, which is a non-retail developer device that looks like what remains of the original N9. There are anumber of small differences between the N9 and the N950, chief among which is inclusion of a hardware QWERTY keyboard and aluminum construction, thanks again to Simon for finding these differences and tipping me on them. 

Nokia Device Specifications
  Nokia N9 Nokia N950
Height 116.45 mm (4.58") (?)
Width 61.2 mm (2.41") (?)
Depth 7.6 - 12.1 mm (0.3" - 0.48") (?)
Weight 135 g (4.76 oz) (?)
CPU TI OMAP 3630 @ 1 GHz TI OMAP 3630 @ 1 GHz
GPU PowerVR SGX 530 PowerVR SGX 530
RAM 1 GB LPDDR 1 GB LPDDR
NAND 16GB or 64GB integrated 16GB or 64GB integrated
Camera 8MP Carl Zeiss 16:9 F/2.2 with Dual LED flash and 720P video capture, Front Facing (?MP) 8MP with Dual LED flash and 720P video capture, Front Facing (?MP)
Screen 3.9" FWVGA (854x480) AMOLED with Gorilla Glass 4.0" FWVGA (854x480) LCD-TFT
Battery 1450 mAh Integrated(?) 1320 mAh
Bluetooth Bluetooth 4.0 Bluetooth 2.1+EDR
WiFi 802.11a/b/g/n 802.11a/b/g/n
NFC Yes No
Sensors Accelerometer, Compass, Proximity, Ambient Light "N9 has a slightly more sensitive magnetometer and ALS"
OS MeeGo 1.2 Hartmattan MeeGo 1.2 Hartmattan

The two devices also have pentaband WCDMA support and quad band GSM/EDGE support, though there's no word on what cellular baseband is at the core of everything. In addition, the N9 includes NFC support, though Nokia hasn't specifically stated whether all three NFC modes are supported. In all likelihood this is assumed now given NFC chipset maturity.

Though the SoC seems dated for a device that still isn't released yet, it's a definite improvement over the N900's 600 MHz OMAP 3430.

Nokia N9/N950- Network Support
GSM/EDGE Support 850 / 900 / 1800 / 1900 MHz
UMTS/HSDPA/HSUPA Support 850 / 900 / 1700 / 1900 / 2100 MHz
HSDPA/HSUPA Speeds HSDPA 14.4 / 5.7 Mbps
Baseband Hardware (?)

The device looks solid, though there's no word on a specific release date or pricing, just "later this year." Nokia has provided a quick specifications PDF, and more information on their conversations blog and website.

Friday, June 17, 2011

Samsung Galaxy Tab 10.1 Review: The Sleekest Honeycomb Tablet

I remember standing in the audience of Samsung's CTIA press conference as it announced, for the first time ever, pricing and availability of its unreleased Galaxy Tab 10.1 and 8.9 before shipping. The smartphone (and early tablet) industries have gone this long without having to really compete based on price, mostly because in North America the carriers subsidize much of the cost. If every device costs $199 under contract, why get carried away with details like how much it actually costs?

The Galaxy Tab however was playing in a different space. While Apple ultimately caved to the pressures of carrier subsidies with the iPhone, the iPad remains completely unsubsidized and its followers buy it by the millions. The magical price point is $499 and it was at Samsung's CTIA press conference that it announced it would be matching Apple's $499 price point, and even dropping slightly below it for the 8.9-inch version.
At the time it seemed like a bold move, enough to give Honeycomb the fighting chance it needed. The Galaxy Tab would be thinner and lighter than the iPad 2 but competitively priced as well. This wouldn't be another Xoom.


Samsung Galaxy Tab 10.1 (top) vs. ASUS Eee Pad Transformer (bottom)

Then ASUS showed up. At $399, the Eee Pad Transformer not only offered a different usage model to the iPad and Galaxy Tab, it brought a lower price tag as well. Availability has been slim thanks to component shortages, but with the Eee Pad selling for $399 the Galaxy Tab at $499 all of the sudden seems overpriced.

2011 Tablet Comparison
  Apple iPad 2 ASUS Eee Pad Transformer Motorola Xoom WiFi Samsung Galaxy Tab 10.1
SoC Apple A5 (Dual ARM Cortex A9 @ 1GHz) NVIDIA Tegra 2 (Dual ARM Cortex A9 @ 1GHz) NVIDIA Tegra 2 (Dual ARM Cortex A9 @ 1GHz) NVIDIA Tegra 2 (Dual ARM Cortex A9 @ 1GHz)
GPU PowerVR SGX 543MP2 NVIDIA GeForce NVIDIA GeForce NVIDIA GeForce
RAM 512MB 1GB 1GB 1GB
Display 1024 x 768 IPS 1280 x 800 IPS 1280 x 800 1280 x 800 PLS
NAND 16GB 16GB 32GB 16GB
Dimensions 241.2mm x 185.7mm x 8.8mm 271mm x 175mm x 12.95mm 249.1mm x 167.8mm x 12.9mm 256.6 x 172.9 x 8.6mm
Weight 601g 695g 730g 565g
Price $499 $399 $599 $499
Based on specs alone you'd be right. Samsung's Galaxy Tab 10.1 has the same NVIDIA Tegra 2 tablet SoC inside,

1GB of LPDDR2 and 16GB of NAND on-board. You get a 10.1-inch 1280 x 800 PLS display and 802.11n WiFi support. It's worth pointing out that we're now well into the month of June and NVIDIA continues to be the only SoC vendor shipping in Honeycomb tablets. Samsung originally had plans to ship its own Exynos SoC in the Galaxy Tab but Tegra 2 remains the port of choice for all Honeycomb vendors at this point. Whether or not NVIDIA can win twice in a row with Ice Cream Sandwich later this year remains to be seen.


Samsung Galaxy Tab 10.1 (left) vs. ASUS Eee Pad Transformer (Right)

Where Samsung gives you something more for your money is in build quality and form factor. While Eee Pad Transformer feels surprisingly good for a cost reduced tablet, it doesn't feel nearly as slim or portable as the Galaxy Tab 10.1. It's no wonder Samsung went back to the drawing board on this one, the result is something that in many ways feels better than the iPad 2.


Apple still gets the nod in terms of quality of materials. The aluminum back of the iPad 2 is unbeatable. The Galaxy Tab 10.1 however feels lighter, a bit more rugged (I'm less concerned about scratching plastic than I am marring aluminum) and a little more comfortable to hold as a result. Against the Eee Pad there's no competition. I can live with the Eee Pad, but I much prefer the feel of the Galaxy Tab 10.1. The new Tab just feels like a device from this year - a complement that, until now, I had only given to Apple.


The Galaxy Tab 10.1 measures just 8.6mm thick, 0.2mm thinner than the iPad 2. To be honest you really can't tell the difference, both devices feel thin. Ever after holding them back to back it's near impossible to tell that Samsung has built a thinner device. The most tangible difference in feel is the weight, not just in overall mass but in terms of weight distribution. The Galaxy Tab seems to carry the weight a bit better than the iPad, a bit more evenly.


Samsung Galaxy Tab 10.1 (left) vs. Apple iPad 2 (right)

Now is as good a time as any to point out that although Samsung calls this the Galaxy Tab 10.1, it's really the new Galaxy Tab 10.1. Originally Samsung announced a much thicker version at Mobile World Congress, a month prior to the CTIA announcement. With the much thinner iPad 2 hitting the market after the original 10.1 announcement, Samsung scrapped plans for the original and unveiled the thinner 8.6mm version as the new Galaxy Tab. The original Galaxy Tab 10.1 is now known as the Galaxy Tab 10.1v.

The Llano Desktop Preview: AMD A8-3850 CPU & GPU Performance

If you haven't gotten the hint, today is all about Llano. The big story is of course Llano's notebook appearance; however, in the coming weeks you'll be hearing a lot more about Llano on the desktop as well. This is AMD's Socket-FM1, the brand new socket that'll be used for desktop Llano parts:


If you read our Computex coverage, the socket should look pretty familiar. Motherboard manufacturers all over Taiwan are busy readying their Socket-FM1 boards for retail release. In fact, there was so much interest in desktop Llano on behalf of the motherboard manufacturers that a number of Socket-FM1 boards and CPUs made their way off the island as Computex ended.


Existing Socket-AM3 coolers will work on FM1 motherboards

By now you may have already seen a lot of information leaked from AMD's Llano presentations, as well as its desktop strategy. In the past few days performance numbers have been revealed as well. While we're hard at work on our full review of AMD's desktop Llano APU, we wanted to chime in with some thoughts on Llano's desktop performance.

AMD isn't ready to disclose pricing or the entire product matrix for Llano on the desktop, but what we do have is the high-end desktop Llano SKU: AMD's A8-3850.


The 3850 has four cores running at 2.9GHz and doesn't support Turbo Core. On the GPU side it has the full Radeon HD 6550D configuration with 400 shader processors running at 600MHz.


Sandy Bridge's GPU performance is the target, but how much better will AMD do on the desktop? Let's find out.

Sunday, June 12, 2011

NEC PA301w: The Baddest 30-inch Display Around

It's been a busy and short two weeks since Anand and I thoroughly covered smartphones, tablets, and SoCs at MWC. I got back to an ever-growing pile of monitors that need reviewing, he got back to the Xoom and new SSDs.

In the monitor space, it's been an interesting couple of months because everyone has been updating their 30-inch display. We reviewed the HP ZR30w back when that happened and came away impressed but wanting more in a couple of areas - more input options, an OSD, and a better scaler. Then came Dell U3011, which brought equally decent performance, a wealth of input options, and that OSD we wanted.


Today we're looking at NEC's latest and greatest, the MultiSync PA301w. I've been playing with a pre-production unit which is identical to what will be shipping, and have put it through the usual paces of our monitor testing suite. First up is the specification table:

NEC MultiSync PA301w
Video Inputs 2xDVI-D w/HDCP, 2xDisplayPort 1.1a
Panel Type P-IPS 10-bit with CCFL Backlight - 0Z100223UW
Pixel Pitch 0.251 mm
Colors 1.07 billion (30 BPP color w/appropriate GPU)
Brightness 350 nits (typical)
Contrast Ratio 1,000:1 (typical)
Response Time 7 ms (GTG), 12 ms (max)
Viewable Size 29.8" (75.6 cm)
Resolution 2560 x 1600 at 60 Hz
Viewing Angle 178 degrees horizontal and vertical
Power Consumption (operation) 165 watts (typical), 90 watts (eco)
Power Consumption (standby) 1.7 watts (standby), 0.2 watts (off)
Screen Treatment Matte/Anti-Glare
Height-Adjustable Yes: 5.9 inches (landscape), 1.2 inches (portrait)
Tilt Yes: +30 degrees, -10 degrees
Pivot Yes: Landscape and Portrait
Swivel Yes: +/- 30 degrees
VESA Wall Mounting Yes: 100 mm x 100 mm
Dimensions w/ Base (WxHxD) 27.1" (688.0 mm) x 18.4-24.3" (466.4-646.4 mm) x 11.9" (301.6 mm)
Weight 41.5 lbs (18.8 kg) with stand
Additional Features Integrated USB 2.0 Switch (2 upstream, 3 downstream, 500mA), self calibration support with i1D2, 10-bit color, quick warmup
Limited Warranty 4 years
Accessories Power, DVI-D, DisplayPort, and USB cables, 4x VESA screws
Price PA301w: $2299, PA301w-BK-SV: $2549

Right away you can tell the PA301w is in a different class of professional displays than the two other counterparts I've already mentioned. It's priced accordingly, and has the professional-oriented inputs and other features. There's no HDMI or component in, nor is there audio pass through. The PA301w is aimed at the professional that demands uncompromising performance and has the budget to satisfy that need. The PA301w is built around a 10-bit P-IPS (Professional-IPS) panel likely sourced from LG. Like the current crop of 30-inch monitors, that means you can drive 30 bit per color (10-bit per channel) content over DisplayPort if you have a capable GPU and the right software. I'm still searching for software that actually uses 30-bit color (if you know of any, I'd honestly love to hear about it), but when that time comes, it'll be supported.

The PA301w also has a few features that I haven't seen in a monitor before. Chief among them is onboard support for some basic calibration with an X-Rite i1D2 colorimeter. Plug it into a USB port on the side of the monitor, go into the OSD, and the display will automatically calibrate white point, brightness, and the color tristimulus values. It doesn't displace software calibration, but gets the monitor to a very workable initial starting position you can tweak from, which (if you've ever calibrated a display before) can be a huge timesaver. The other interesting hardware feature is something of a built-in KVM USB switch. There are two USB downstream ports, which can be associated with particular display inputs and switch peripherals accordingly. Lastly, there are a number of green/power-saving features to both show power use and offer power savings by doing some auto brightness adjustment when applicable.

On to the hardware itself - the PA301w is seriously a beast. It's the biggest, baddest monitor around in terms of just sheer size. I don't usually start off talking about boxes, but there's just no other way to really demonstrate the magnitude of the PA301w's size without doing so.


The box is easily two times the size of the HP ZR30w box, and almost three times how big I remember the Dell U3011 box being. It doesn't fit underneath any table or surface in my living room. It fills a good chunk of that room just sitting around, empty, even right now. I've never seen something like it on a monitor box (maybe a refrigerator?), but there's even a wince-inducing typo-ridden warning message encouraging that the monitor be remobed[sic] by two people.


Luckily, I have superhuman strength (yeah right...) and managed to get the thing out intact just by myself. It's a heavy monitor, at just over 41 lbs (18.8 kg) including stand. The PA301w comes fully assembled and in the upright position. There was more than adequate packing to keep the whole thing safe during transit.
That's a nice segue into the hardware features of the PA301w. At the bottom of the display arm is a locking switch for holding the monitor at its lowest position.


The display ships with it locked in position so you can lift the thing without the height adjustment arm fully extending. It's seriously surprising how many displays lately lack locking height adjustment arms, which makes transportation a pain, so it's nice to see it here.

Also on the back of the display is a cable routing guide, which NEC calls a "cable cover." You route the cables underneath on each side, then slide the plastic cover down and hide everything. In practice, it's really only useful if you don't rotate the monitor 90 degrees, since doing so will always create cable flex and demand more slack than you've got back there. It works if you keep things strictly landscape, however.


The backside of the PA301w is on the whole very spartan. There's an NEC logo up top, the two hand grips for transport if you're lucky enough to have a friend handy, and as we'll get to in a second the standard fare kensington lock and ports on the underside. There's a total of 5.9 inches of travel in the vertical direction when the monitor is in landscape mode, which is a huge amount, but necessary for portrait mode.


The PA301w has a generous amount of tilt in the upward direction (30 degrees), and only a slight 5-10 degree tilt in the downward direction. There's a lot of monitor to move around, but in spite of that, the springs on the PA301w are nicely preloaded. Tilt can still be somewhat challenging to manipulate though, and definitely requires use of both arms to manipulate the display.


There's also +/- 30 degrees of swivel support on the base. You can see the circular section at the back which the display arm rotates around. The base is weighted and there's no chatter as the huge thing rotates around, which is awesome. Thankfully, swivel is easily accomplished with one arm.


You'll notice so far that there's really no superficial aesthetic extras tacked onto the PA301w; this is a serious professional display. There's no metallic bezel running around the whole thing, no fancy shiny chrome parts, no gigantic self-aggrandizing logos on the back, no stickers plastered everywhere selling you what you've already ostensibly purchased and taken out of the box. It's just one huge monolithic slab of serious business.


The front of the PA301w is also understated. The OSD control buttons are at the bottom right, and they're actual real clicky buttons, nothing capacitive. At the far left is the ambient light sensor, followed by power, followed by the power/status LED which glows blue when on, amber when in standby. The rest of the buttons are self explanatory and as we'll show in the OSD section get their own LCD driven labels when you actually jump into the OSD.


I've already shown it, but on the right side of the PA301w is one of the three downstream USB 2.0 ports. This port is rather special, however, since it's the one you can plug the X-Rite i1D2 in for onboard calibration.

Of course, the port also works like normal when you're not in that special OSD section. The opposing side is spartan. I should also mention that the PA301w actual display panel is super thick, around 5" (12.7 cm). It's not a big deal, but it's just absolutely huge in comparison with other displays, so be prepared. The remainder of the ports are along the bottom of the lip underside. From left to right, the two remaining downstream USB 2.0 ports, two USB 2.0 upstream ports, 2x DisplayPort 1.1a, 2x DVI-D, and power.

What really sets the PA301w apart in my mind, however, is pivot support. That's right, you can use it in portrait orientation without using your own VESA mount. I should mention that although I didn't do it, you can get to the VESA mounting holes by pushing on the metal quick release lever right at the bottom of the mount.
Getting to portrait orientation is a bit of a challenge, however, as you can't simply just rotate the display 90 degrees - doing so crashes one side down into the base. The display also only rotates in the clockwise direction a significant amount. Counterclockwise rotation is limited to just a few degrees when facing the display from the front.


First, the display has to be tilted all the way out, then it can be rotated 90 degrees, and tilted back into perpendicular position. Rotate orientation in the display driver, and you're good to go. Vertical travel is limited to 1.2 inches in portrait, but hey, it's something, and it totally works.

Build quality of the PA301w isn't wanting for improvement at all. Though the exterior is entirely plastic, the entire display feels beefy and doesn't vibrate or chatter around when being adjusted. If you vibrate your desk while typing, the whole thing doesn't shudder either. Again, the spring preloads are just perfect for buttery smooth adjustment and damping on essentially every degree of freedom.

Related Posts Plugin for WordPress, Blogger...
Powered by Blogger.